
When a houseplant starts looking like it is dying, the instinct is usually to water it, feed it or move it somewhere new straight away. The problem is that guessing can make things worse. To revive a dying houseplant, check the soil, roots, light, leaves and pests first, then fix the most likely cause in the right order.
If the plant is drooping in wet compost, smells bad, or has soft black roots, the problem may be below the soil line. In that case, you can also read Root Rot Houseplants for a closer look at root damage and recovery.
Quick answer: how to revive a dying houseplant
- Check the soil first: most dying houseplants are either too wet, too dry or sitting in compacted compost
- Move the plant into bright, indirect light, away from harsh sun, cold draughts or heat sources
- Remove dead, yellow or crispy leaves so the plant can focus energy on healthier growth
- Inspect the undersides of leaves, stems and compost surface for pests before treating anything
- Check the roots if the soil is wet, smells bad or the plant keeps drooping after watering
- Wait for signs of recovery, such as firmer leaves or new growth, before feeding again
Do this first: Check the moisture below the surface at a depth that suits the pot and plant rather than relying on one fixed measurement. If the compost feels wet and heavy, stop watering and check the roots. If the root ball is very dry, water thoroughly and let the excess drain away.

Work Out What’s Actually Wrong First
A dying plant usually shows one or more of these:
-
Drooping (even after watering)
-
Yellowing leaves spreading quickly
Yellow leaves can come from watering, light, pests, poor drainage or natural ageing, so check the pattern before assuming the plant is dying.
-
Mushy stems near the base
-
Soil staying wet for days
-
Lots of leaf drop
Several plant problems can look similar at first, so compare the symptoms with other common indoor plant problems before changing everything at once.
The “fix” depends on the cause. Use this simple split:
If the soil is wet or heavy
Think: overwatering, poor drainage, or root rot.
If the soil is bone dry and shrinking from the pot
Think: underwatering or water-repellent compost.
If soil is fine, but growth looks weak
Think: low light, pests, or root-bound stress.

Step 1: Fix Watering First
If the soil is soggy
What to do today
-
Empty any outer pot/cachepot and saucer water
-
Move the plant to a warmer spot with bright, indirect light
-
Don’t water again until the top layer dries and the pot feels lighter
Fast clue: if the pot feels heavy and cold, roots are likely struggling.
If the compost smells sour, stale or rotten as well as staying wet, check why indoor plant soil smells bad before leaving the plant in the same mix.
If the soil is very dry
What to do today
-
Water slowly until it runs through the drainage holes
-
Let it drain fully (no standing water)
-
Check again tomorrow — very dry compost sometimes needs a second thorough soak
Avoid this: small splashes every day. It often wets the top but leaves the root ball dry.
If you keep repeating the same watering mistakes, it’s worth reading Indoor Plant Watering Mistakes.
Step 2: Move It to Bright, Indirect Light
Light is the plant’s “energy budget” for recovery. A dying plant usually does best in bright, indirect light — close to a window, but not baking in midday sun.
Signs it needs more light
-
long, stretched stems (leggy)
-
tiny new leaves
-
slow growth even when watered correctly
Signs it’s getting scorched
-
crispy patches on leaves that face the window
-
bleaching or pale areas that appear quickly
Quick rule: if the plant has been in much lower light, increase its exposure gradually and watch for bleaching or scorching rather than following a fixed number of days.
Step 3: Check for Pests (They Can Finish Off a Weak Plant)
When a plant is already stressed, pests hit harder. Check:
-
undersides of leaves
-
leaf joints and stems
-
new growth (pests love soft tissue)
What you might see
-
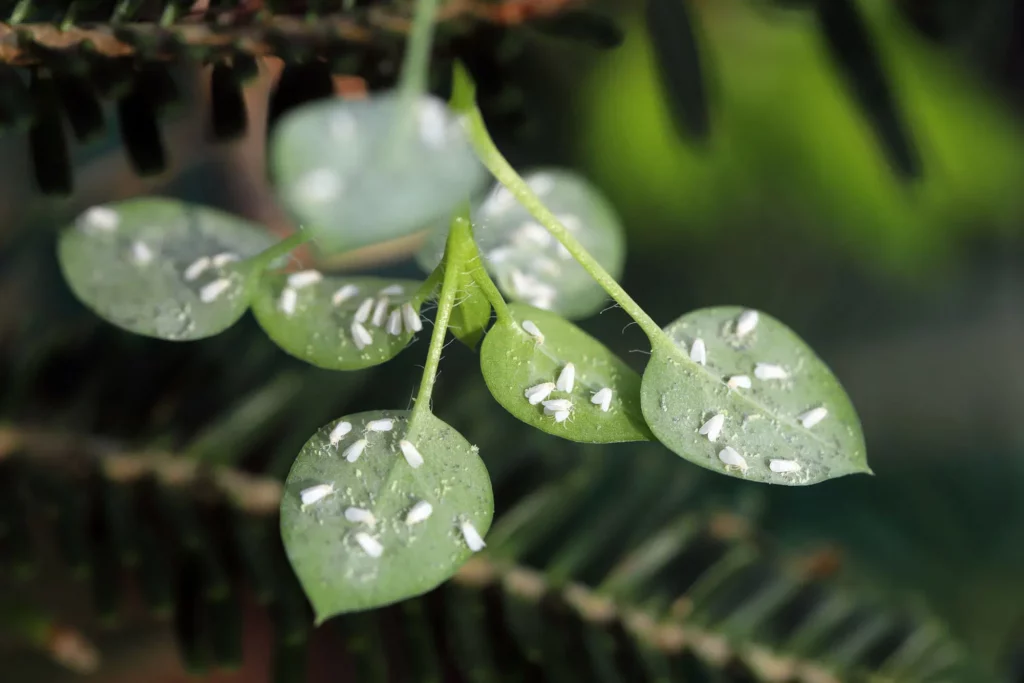
fine webbing + speckled leaves (spider mites)
-
cottony clumps (mealybugs)
-
brown bumps on stems (scale)
-
silvery streaks (thrips)
If you are not sure which pest you are dealing with, use an indoor plant pest guide before spraying, wiping or repotting the plant.
A beginner-friendly option is insecticidal soap spray for houseplants only where the exact product label permits use on the plant and pest involved; follow that label for application, repeat intervals and precautions.
Step 4: Inspect the Roots
If your plant still looks awful after fixing watering + light, slide it out and look at the roots.
Healthy roots look like
-
firm
-
light-coloured (white/tan)
-
earthy smell
Rotting roots look like
-
brown/black
-
mushy or slimy
-
bad smell
If you find rot:
- Trim away mushy roots
- Remove the wettest old compost
- Repot into fresh, airy mix
- Water lightly once, then let it dry slightly between checks
A free-draining indoor potting mix makes a big difference during recovery because roots aren’t sitting wet for days.
Step 5: Repot Only When It’s the Right Fix
Repotting helps when:
-
soil stays wet for ages
-
roots are circling tightly (root-bound)
-
the compost has compacted and drains poorly
-
you’ve confirmed rot and need fresh mix
Repotting doesn’t help if:
-
the plant is just thirsty
-
it’s only a light issue
-
it’s stressed but roots look healthy and the soil drains well
If you’re not sure whether it needs a bigger pot, see Signs Indoor Plant Needs Repotting.
Step 6: Prune Smart (Don’t Strip the Plant Bare)
A dying plant still needs leaves to recover — they’re how it makes energy.
Do remove
-
fully dead leaves
-
mushy stems
-
heavily infested growth
Don’t remove
-
lots of healthy green leaves “for tidiness”
-
more than about a third at once (unless rot is spreading)
For cleaner trims (especially on soft stems), small plant pruning snips reduce tearing and damage.
Step 7: Hold Off Fertiliser Until You See New Growth
Fertiliser is not first aid. Feeding stressed roots can make things worse.
Feed only when
-
you see new growth starting again, and
-
the plant is in its active growing phase
According to Royal Horticultural Society advice on houseplant care, improving basics like watering and light comes before adding feed.
FAQs About Reviving a Dying Houseplant
How long does it take to revive a dying houseplant?
There is no reliable fixed recovery time. A mildly stressed plant with healthy roots may improve sooner than a plant recovering from root damage or repotting. Watch for firmer growth, stable moisture use and healthy new leaves or roots instead of expecting recovery by a particular week.
Should I water more if it’s drooping?
Not until you check the soil deeper down. Drooping with wet soil usually means roots can’t take up water properly.
Can I cut off all the yellow leaves?
Remove fully yellow leaves that come away easily, but keep healthy leaves so the plant can recover.
Why does my plant look worse after watering?
If roots were already stressed, extra water reduces oxygen further. Pause watering and check drainage/root health.
Do I need to repot straight away?
Only if soil is staying wet, smells sour, or roots are clearly cramped/rotting. Otherwise stabilise first.
Final Thoughts on Reviving a Dying Houseplant
To revive a dying houseplant, focus on the basics in the right order: soil check first, then light, then pests, then roots. Most plants recover once conditions stop swinging between extremes.
If you only do one thing today, stop “panic watering” and diagnose properly — that single change saves more houseplants than any product.
Related Articles
MAKE PLANT RECOVERY FEEL EASIER
Set Up a Simple Rescue Routine
Reviving a struggling plant is much easier when you can check soil properly, trim damaged growth cleanly, and improve drainage without guesswork. A simple tool setup helps you act quickly and keep plants healthier long-term.