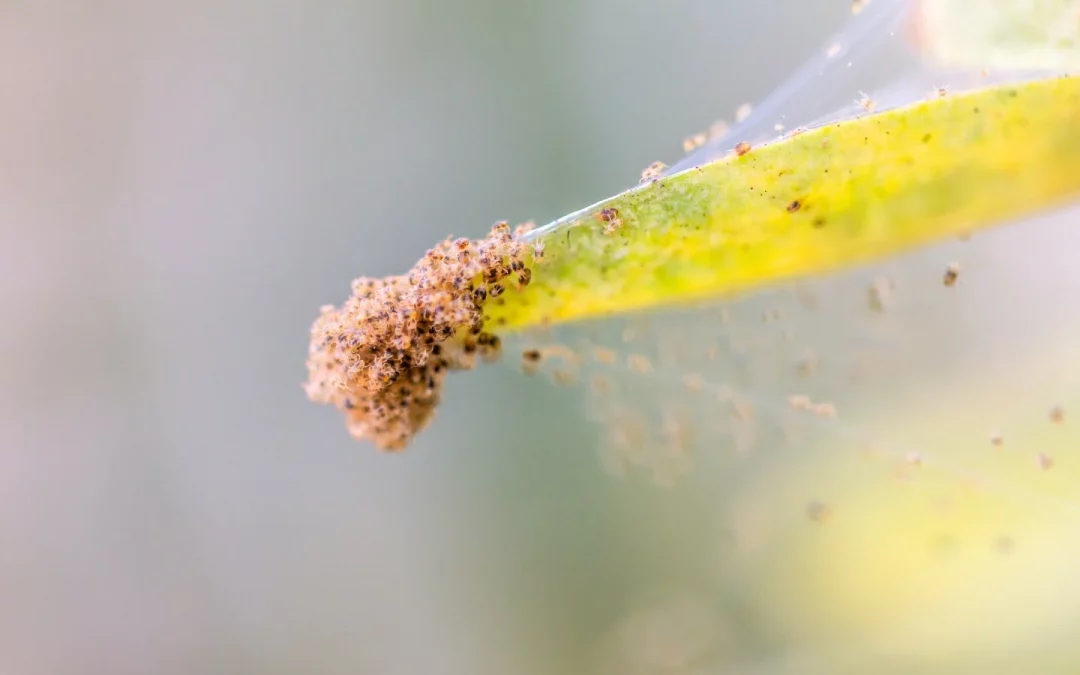
Spider mites are tiny plant-feeding mites that can build up on houseplants before you notice the first web. Early damage often looks like pale speckling, a dull or washed-out leaf surface, or tiny moving dots on leaf undersides. In a heavier infestation, fine silk webbing may appear around leaf joints and stems.
The reassuring part is that you do not need a dramatic response to begin. Isolate the plant, reduce the visible population with water and careful wiping where appropriate, then keep checking. If you choose a commercial treatment, use one that is labelled for the plant, the pest and indoor use, and follow its instructions exactly.
Quick Answer
Move the affected plant away from the rest of your collection, inspect nearby plants, and check the undersides of leaves for stippling, webbing and moving mites. Rinse or wipe off as many mites as you can without damaging the plant. Then monitor repeatedly and, if physical removal is not enough, use a suitable labelled treatment with full underside coverage.
One treatment rarely proves the problem is over. Eggs and hidden mites can survive the first attempt, so your follow-up checks matter just as much as the first rinse.
Do this first
- Isolate the affected plant so leaves cannot touch other plants.
- Inspect nearby plants, especially their leaf undersides and new growth.
- Confirm the likely pest before spraying anything.
- Rinse or carefully remove as many mites, webs and cast skins as practical.
- Start an appropriate repeated management plan, with any product interval set by its label.
How to identify spider mites on houseplants
Spider mites are arachnids, not insects, and they are often difficult to see without magnification. You may notice their feeding damage before you see the mites themselves.
Look for fine pale stippling or speckling on the upper surface of leaves, particularly when it gradually makes a leaf look dull, greyed or washed out. Check the undersides as well: spider mites, eggs and pale cast skins often gather there, especially along veins and near the leaf stem. Fine silk webbing is a stronger clue when it is wrapped around leaves, buds or stems, but not every infestation has obvious webbing at first.
Use a bright window or lamp and a 10x hand lens if you have one. The RHS guide to glasshouse red spider mite notes that the common two-spotted spider mite affects houseplants and that fine mottling, underside activity and webbing are key signs.
Use a tap test and tissue check as supporting clues
Hold a plain sheet of white paper beneath a leaf with stippling, then tap the leaf sharply. If tiny specks fall and begin to move, inspect them closely. Folding the paper or pressing the specks can sometimes leave reddish-brown streaking. This is a useful clue, not a diagnosis on its own: combine it with underside inspection, the damage pattern and any webbing. University of Maryland Extension explains this white-paper check in more detail.

Spider mites vs thrips and other pests
Spider-mite damage can resemble other problems, especially early on. The difference matters because a treatment chosen for the wrong pest may waste time or stress the plant.
On smaller screens: scroll sideways to view the full table.
| Sign | Spider mites | Thrips | Other common clue |
|---|---|---|---|
| Typical leaf damage | Fine pale stippling or mottling that can turn dull or bronzed | Silvery streaks or scraped-looking patches | Yellowing by itself has many possible causes |
| Webbing | Fine silk webbing may appear in heavier infestations | Not typical | Cottony clumps suggest mealybugs; sticky residue can suggest aphids or scale |
| What you may see | Tiny moving dots, eggs or cast skins on leaf undersides | Slender insects plus small shiny black droppings | Tiny flies around compost are more likely fungus gnats |
If the leaf damage is mainly silvery streaking with black specks rather than fine webbing and stippling, compare it with our guide to thrips on indoor plants before choosing a treatment. For a broader check of common symptoms, use the indoor plant pest guide.
What to do immediately
Start with the steps that lower the population and limit spread without adding unnecessary chemicals.
- Isolate the plant. Put it away from other houseplants and make sure leaves are not touching. Wash your hands after handling it, then inspect nearby plants rather than assuming they are clear.
- Remove the worst damage carefully. If a few leaves are densely webbed or badly damaged, remove them only if doing so will not strip the plant bare. Dispose of the removed material rather than leaving it beside the plant.
- Rinse small, sturdy plants. A plant-appropriate spray of water can dislodge many mites and disturb webbing. Support the plant, direct water at leaf undersides and let excess water drain away.
- Wipe larger or sturdier leaves. Use a soft, damp cloth and support the leaf from below. Do not scrub delicate, fuzzy or easily marked leaves. Our guide to cleaning dust from indoor plant leaves can help you choose a gentler method for the leaf type.
- Check again. Look at new growth, leaf joints and neighbouring plants over the next several days. This tells you whether physical removal is keeping pace with the infestation.

How to treat spider mites on houseplants
Treatments work best as part of the sequence above, not as a substitute for inspection and removal. Do not mix household chemicals or make a homemade spray from washing-up liquid, alcohol, essential oils or other products. Their concentration, additives and suitability vary too much to give a safe universal recipe.
Rinsing and physical removal
For a light infestation, repeated rinsing and wiping may be enough to bring numbers down. Focus on leaf undersides, where mites often feed, and remove dust that makes close inspection harder. This approach is especially useful while you are confirming the pest or deciding whether the plant will tolerate a spray.
Physical removal cannot show that every egg or mite is gone. Keep the plant isolated and continue checking, because a few survivors can rebuild the population.
Insecticidal soap
An insecticidal soap can be a suitable option when the label states that it controls mites, is appropriate for your houseplant and can be used in the setting where you will apply it. These products need contact with the mites, so complete coverage—especially on leaf undersides—matters more than simply misting the top of the plant.
Check the label for plant sensitivity, repeat interval, protective equipment and ventilation instructions. If it allows a test application, test a small area first and wait for the stated period before treating the whole plant. Do not assume that “natural” or “gentle” means suitable for every leaf type.
Horticultural oil and other labelled options
Horticultural oils and some other oil-based treatments may help with mites when they are specifically labelled for the pest and plant. Neem-based products are not a universal default: formulations differ, and an oil can mark or injure sensitive, water-stressed or heat-stressed plants.
Use only the dilution, timing and repeat interval on the product label. Apply when the label’s light and temperature conditions are met, keep children and pets away as directed, and allow the plant to dry in an appropriate, ventilated place. The UC IPM houseplant guide gives the same label-first approach for indoor soap, oil and other pesticide decisions.
When stronger pesticide treatment may be appropriate
Consider a stronger commercial pesticide or miticide only when the infestation is confirmed, physical removal and a suitable lower-risk labelled option have not been enough, and the product is explicitly labelled for indoor use on your plant species and against mites. Many general insecticides do not control spider mites well, so buying a broad product simply because it says “bug killer” is not a reliable approach.
Read the label before purchase and again before use. It controls the legal use, mixing, protective equipment, ventilation, application site, repeat interval and any restrictions around pets, children, food plants or flowering plants. If you cannot use the product exactly as labelled, choose a non-chemical approach or remove the plant from the collection instead.
A realistic repeat-treatment schedule
Use this as a check-and-act schedule, not a universal spray calendar. Commercial product labels override every generic date below. Some products specify a different interval, limit the number of applications or are not suitable for your plant at all.
| Checkpoint | What to do |
|---|---|
| Day 1 | Isolate, inspect, rinse or wipe, remove severely affected material where sensible, and apply a labelled treatment only if you have confirmed it is appropriate. Record what you used. |
| Day 4 | Recheck leaf undersides, new growth and nearby plants. Remove visible mites or webbing again. Do not automatically reapply a product unless its label allows that timing. |
| Day 7 | Inspect carefully. If mites remain and the product label calls for another application, follow that label exactly; otherwise continue physical removal and monitoring. |
| Day 10 | Check for fresh stippling, webbing or moving mites. Reassess whether the plant is improving and whether nearby plants need attention. |
| Day 14 | Carry out another detailed check. Continue any label-directed cycle only while evidence of active mites remains and the plant is tolerating treatment. |
| Day 18–21 | Make a final close inspection of the original plant and its neighbours. If you still find active mites, continue management according to the product label or consider whether keeping the plant is putting the collection at risk. |
The point of this schedule is to catch mites that were missed or newly hatched after the first response. It is not a promise that a set number of applications will eliminate every infestation.
When should you give up on a badly infested plant?
Most spider-mite problems are worth attempting to manage, especially when caught early. Consider removing a plant from the collection when it has extensive webbing and leaf loss, remains heavily active after careful repeated management, cannot be isolated, or is putting a larger or more valuable collection at risk.
This is a practical decision. A severely weakened plant with little healthy foliage may recover slowly even after mite numbers fall. Removing it can be the calmer option when you cannot safely or consistently continue treatment. If you do discard a plant, inspect its former location and all neighbouring plants over the following weeks.
How to prevent spider mites returning
Spider mites often arrive on a new plant or build quietly until damage becomes visible. Prevention is therefore mainly about early detection and reducing the conditions that help an infestation build unnoticed.
- Inspect new plants before they join the rest of the collection, paying attention to undersides, leaf joints and new growth.
- Check established plants regularly, especially when rooms are warm, dry or dusty.
- Keep leaves reasonably clean so stippling, webbing and moving mites are easier to see.
- Remove badly damaged material and plant debris rather than letting it remain around the plant.
- Avoid avoidable stress such as chronic drought or unsuitable placement, but do not assume a stressed plant caused the infestation.
- Leave enough space to inspect leaves and stop plants from constantly touching. Gentle air movement can support a suitable growing environment, but it is not a treatment for an active infestation. See air circulation for indoor plants for practical setup advice.
Warm, dry conditions can favour spider mites, but increasing humidity alone will not remove an established population. Avoid turning prevention into constant misting: inspect, clean and respond early instead. A simple indoor plant maintenance routine makes those checks easier to keep up.
Frequently Asked Questions
Can spider mites spread to other houseplants?
Yes. They can move between nearby plants, particularly where foliage touches, and can be carried during handling. Isolate the affected plant and inspect its neighbours instead of treating one plant in isolation.
How often should I treat spider mites?
How often you apply a commercial treatment depends on that exact product label. Check the plant every few days at first, but do not create your own spray calendar. The label controls the product’s repeat interval, maximum applications and safe use conditions.
Can I wash spider mites off a plant?
Water can remove many mites and disturb webbing, especially on small, sturdy plants. It is a useful first step, but it does not prove eggs and hidden mites are gone. Repeat inspections are still needed.
Should I throw away a plant with spider mites?
Not automatically. Try isolation, physical removal and proportionate label-directed management first where practical. Consider removing a severely affected plant when it is not improving, cannot be isolated or is threatening the wider collection.
How can I tell spider mites from thrips?
Spider mites are more associated with fine stippling, underside activity and webbing. Thrips tend to leave silvery scraping or streaking and small dark excrement spots. If you are unsure, check the plant closely before treating.
Keep Learning
Indoor Plant Pest Guide
If the signs do not clearly match spider mites, use the indoor plant pest guide to compare the most common houseplant pests before choosing a treatment.
Final Thoughts
Spider mites are easiest to manage when the response is calm and repeated: isolate, inspect, rinse or wipe, then follow up until there is no evidence of active mites. The goal is not to find one dramatic spray. It is to identify the pest correctly, lower the population, protect nearby plants and use any commercial product exactly as its label directs.
Keep checking leaf undersides after the plant appears better. That small habit is what turns a short-lived improvement into a more reliable recovery.
Related Articles
- Indoor Plant Pest Guide
- Thrips on Indoor Plants
- How to Clean Dust Off Indoor Plant Leaves
- Air Circulation for Indoor Plants Explained
Fix the stress that makes pests stick around
Keep Spider Mites Away With Better Humidity and Airflow
Spider mites thrive in warm, dry, still air, so prevention is mostly about improving conditions rather than doing constant treatments.