
Contents
- 1 How to Grow Microgreens Indoors: A Beginner’s Guide for Fresh, Fast Harvests
How to Grow Microgreens Indoors: A Beginner’s Guide for Fresh, Fast Harvests
Growing your own food at home doesn’t have to take months or require a big garden. In fact, one of the easiest and fastest ways to enjoy fresh, nutritious greens is to grow microgreens indoors. These tiny, vibrant shoots are packed with flavor and nutrients, and they’re ready to harvest in just 7–14 days.
Whether you live in a flat with limited space or just want a fun kitchen project, this beginner’s guide will show you how to grow microgreens indoors with minimal equipment and maximum results.
What Are Microgreens?
Microgreens are young vegetable greens harvested just after the first true leaves develop. They are not sprouts, but rather seedlings of popular herbs and vegetables such as:
- Broccoli
- Radish
- Beetroot
- Kale
- Peas
- Basil
- Coriander
They’re loved for their intense flavor, high nutritional value, and quick growth time.
Why Grow Microgreens Indoors?
- Fast harvest: Ready in under two weeks.
- Space-saving: Grows easily on windowsills, countertops, or shelves.
- Low maintenance: Requires minimal tools and effort.
- Nutritious: Studies show microgreens can contain up to 40x more nutrients than their mature counterparts (source: Healthline).
What You Need to Grow Microgreens Indoors
You don’t need fancy gear to get started. Here’s a basic list:
- A shallow tray with drainage holes
- Organic microgreen seeds (like broccoli, radish, or mustard)
- Seed-starting soil or coconut coir
- A spray bottle
- A grow light (optional but helpful in low-light homes)
Recommended Product:
This reusable, BPA-free tray is perfect for starting microgreens indoors.
Step-by-Step: How to Grow Microgreens Indoors
1. Fill the Tray with Soil
Use 1–2 inches of seed-starting soil or coconut coir. Lightly pat it down but don’t pack too tightly.
2. Scatter the Seeds Evenly
Sprinkle your seeds generously across the surface. There’s no need to bury them.
3. Mist the Surface
Use a spray bottle to evenly moisten the seeds. Cover the tray with a plastic dome or another tray to create a dark, humid environment.
4. Let Them Germinate
Keep the tray covered for 3–4 days in a warm, dark place. Mist once or twice a day to keep the top layer moist.
5. Give Them Light
Once sprouts appear, uncover and place the tray in a bright window or under a grow light. Microgreens need 10–12 hours of light daily for healthy growth.
6. Water Carefully
Bottom watering is best—place your tray in a second tray with a small amount of water and let the soil soak it up. This prevents mold and damp leaves.
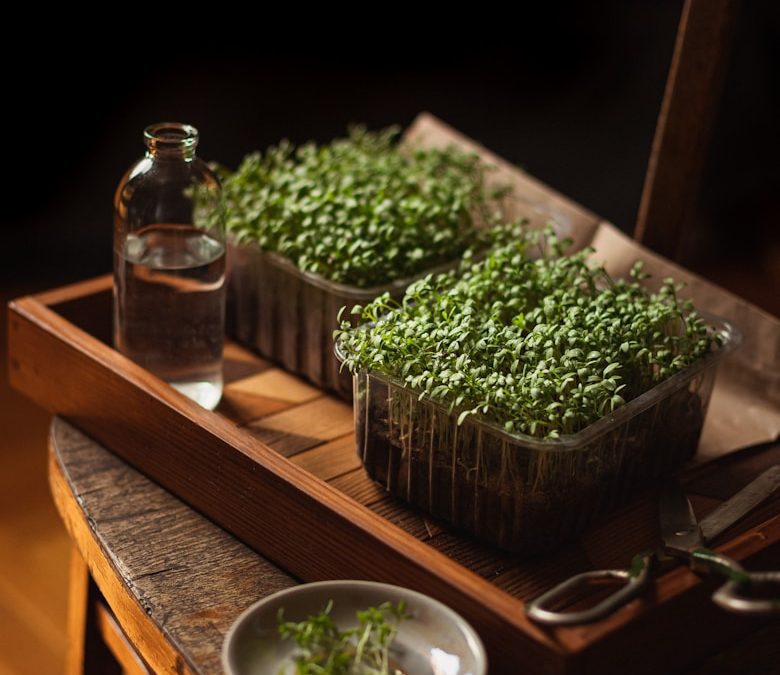
7. Harvest!
In 7–14 days, when the microgreens are about 2–3 inches tall and have developed their first true leaves, snip them at the base with clean scissors.
Best Microgreens to Start With
Some varieties are easier and faster than others:
- Radish – Fast and spicy
- Broccoli – Mild and nutritious
- Sunflower – Crunchy with a nutty flavor
- Pea shoots – Sweet and tender
Try a variety pack to discover what you like best.
Troubleshooting Common Microgreen Issues
Mold on Soil
- Cause: Overwatering or poor air circulation.
- Fix: Use bottom watering, space seeds evenly, and keep air moving with a fan.
Leggy Growth
- Cause: Not enough light.
- Fix: Move to a brighter spot or use a grow light.
Poor Germination
- Cause: Old seeds or too much dryness during germination.
- Fix: Always use fresh seeds and mist daily.
How to Use Your Microgreens
Microgreens are incredibly versatile:
- Sprinkle on salads, sandwiches, and soups
- Blend into smoothies or juices
- Use as a vibrant garnish
- Mix into omelets or wraps
They add a burst of flavor, color, and nutrition to almost any dish.
Final Thoughts
Learning how to grow microgreens indoors is a rewarding way to enjoy fresh, home-grown greens all year round. They require minimal effort, cost very little to start, and deliver exceptional taste and health benefits. Whether you’re gardening for health or fun, microgreens are the perfect entry point for anyone.
Start your microgreen growing journey today and experience the satisfaction of harvesting your own food right from your kitchen.