

Contents
- 1 How to Build a DIY Smart Plant Setup (Monitor, Water & Grow Automatically)
- 1.1 Why a Smart Plant Setup Is Worth It
- 1.2 Step 1: Choose the Right Sensors
- 1.3 Step 2: Add an Automatic Watering System
- 1.4 Step 3: Install Smart Grow Lights
- 1.5 Step 4: Connect Everything to a Smart Hub or App
- 1.6 Step 5: Optional Add-Ons for a Complete Setup
- 1.7 Step 6: Monitor and Fine-Tune
- 1.8 Related Articles
- 1.9 Final Thoughts on Building a DIY Smart Plant Setup
- 2 Create Your Own Indoor Jungle
How to Build a DIY Smart Plant Setup (Monitor, Water & Grow Automatically)
Tired of guessing when to water your plants or whether they’re getting enough light? A DIY smart plant setup lets you automate everything — from watering to lighting — using affordable tools and sensors.
In this guide, you’ll learn how to build your own smart system at home that keeps your plants perfectly healthy — without daily effort.
Why a Smart Plant Setup Is Worth It
A smart plant setup uses sensors, timers, and automation tools to monitor conditions like light, temperature, humidity, and soil moisture. It takes the guesswork out of plant care, especially if you travel or forget to water occasionally.
Benefits include:
Automatic watering at the right time
Real-time data on plant health
Consistent lighting for better growth
Fewer pest and overwatering problems
Peace of mind when away from home
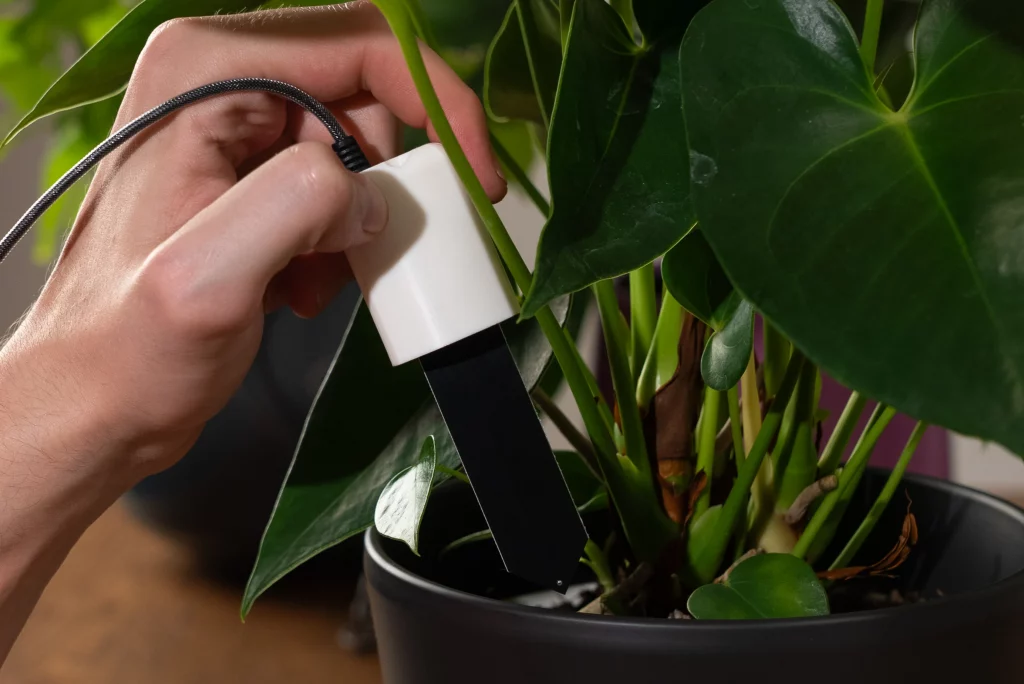
Step 1: Choose the Right Sensors
The foundation of a smart setup is your sensors. They measure essential conditions like soil moisture, light levels, and air humidity.
Recommended sensors to include:
Soil moisture sensor: Detects when roots need watering.
Light sensor: Tracks how much light your plants receive.
Temperature & humidity sensor: Keeps your environment stable.
The Smart Moisture Sensor on Amazon pairs with your phone to track soil conditions in real time.
The ThermoPro Smart Hygrometer on Amazon monitors temperature and humidity — ideal for tropical plants.
Place sensors in your largest or most sensitive plants to get representative data for your whole setup.
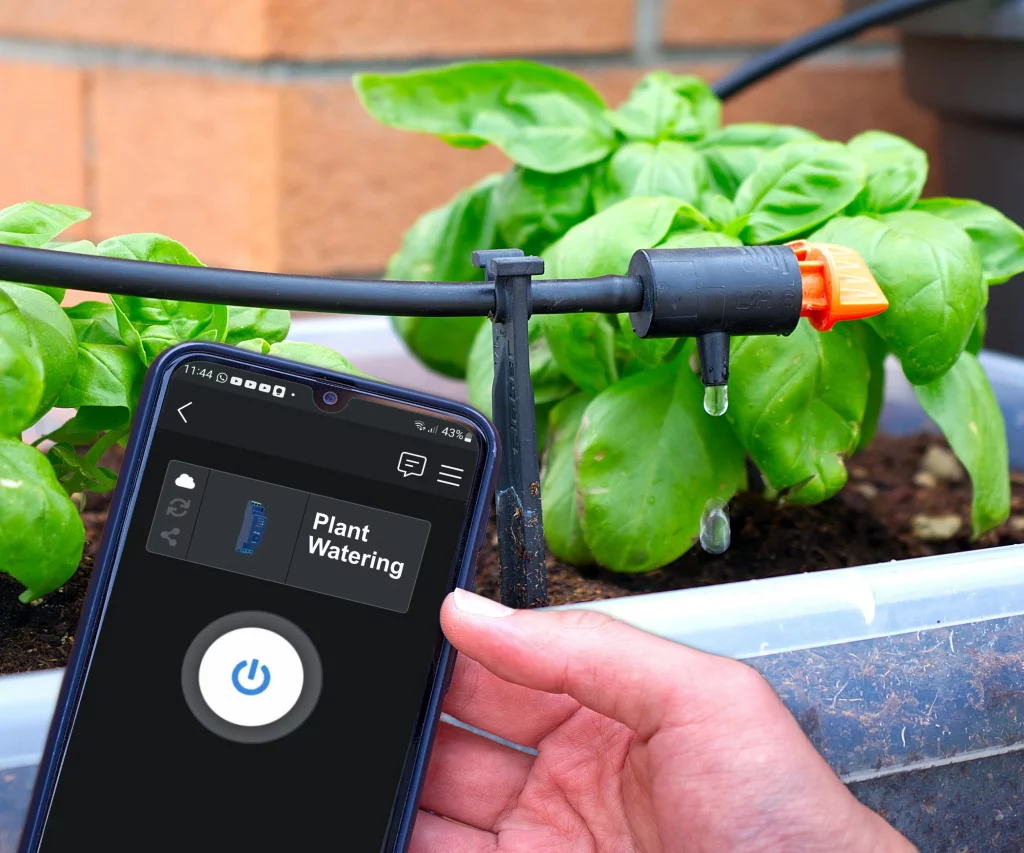
Step 2: Add an Automatic Watering System
Smart watering is the biggest time-saver. You can set up a drip irrigation kit or self-watering pump that activates only when soil moisture drops below a chosen level.
DIY watering options:
Drip irrigation system: Great for multiple pots.
USB-powered pump: Connects to a water reservoir and timer.
Smart Wi-Fi watering device: Pairs with an app for full automation.
The Moistenland Automatic Drip Irrigation Kit on Amazon allows you to water up to 10 pots at once — perfect for small indoor gardens.
💡 Tip: Always test the system first to ensure even flow and avoid leaks.
Step 3: Install Smart Grow Lights
Light control is crucial for consistent plant health, especially in darker rooms or during winter. Smart grow lights can be scheduled automatically or synced with your plant’s growth cycle.
What to look for:
Full-spectrum LED lighting
Adjustable brightness
Timer or app control
Energy-efficient bulbs
The GE Smart Grow Light on Amazon connects to Alexa or Google Home and adjusts brightness automatically.
Position lights 12–18 inches above the plants for balanced coverage.
Step 4: Connect Everything to a Smart Hub or App
A smart hub brings your system together — allowing you to view and adjust all your devices from one interface.
Popular choices include:
Amazon Alexa / Google Home: Integrates lights, humidifiers, and sensors.
Smart Life or Tuya App: Works with most Wi-Fi plant devices.
Home Assistant: A customizable DIY option for tech enthusiasts.
With automation routines, you can set conditions like:
“If humidity drops below 40%, turn on humidifier.”
“If soil moisture <30%, activate watering pump.”
“Turn on grow lights for 8 hours per day.”
Step 5: Optional Add-Ons for a Complete Setup
You can expand your smart garden over time with these optional extras:
Smart humidifier: Maintains consistent humidity.
Smart fan: Improves air circulation to prevent mold.
Smart camera: Lets you monitor your plants remotely.
The Smart Humidifier on Amazon automatically adjusts humidity based on real-time sensor readings.
These additions aren’t essential, but they create a truly hands-off, self-regulating indoor ecosystem.
Step 6: Monitor and Fine-Tune
Once your system is running, spend the first week observing how your plants respond. Some may prefer drier soil or different light timing.
Fine-tuning tips:
Adjust watering intervals based on plant type.
Group plants with similar light and humidity needs.
Use data logs from your app to identify trends.
Over time, you’ll learn exactly what works — and your plants will thrive with minimal intervention.
Related Articles
- How Smart Sensors Can Save Your Houseplants
- How to Create the Perfect Watering Schedule for Indoor Plants
- Small-Space Gardening Tools
Final Thoughts on Building a DIY Smart Plant Setup
Building a DIY smart plant system doesn’t require technical experience — just a few smart tools and a bit of setup time.
By automating watering, light, and environmental control, you’ll make your indoor garden more resilient and far easier to maintain. With the right tools in place, your plants practically take care of themselves.
Bring the Tropics Home
Create Your Own Indoor Jungle
Discover easy-care tropical houseplants that transform your indoor space into a lush, vibrant retreat — no greenhouse required.